
You passed your boards, you're working the floor, and you're good at what you do. But somewhere around month 18, a quiet question starts forming: Is this it?
The answer is almost certainly no — not because general radiography isn't a valuable and rewarding career, but because the RT(R) credential is a foundation, not a ceiling. Post-primary certifications in Computed Tomography (CT), Magnetic Resonance Imaging (MRI), and Mammography represent some of the most accessible and high-value career moves in the allied health field. They come with real financial upside, genuine clinical specialization, and doors to practice settings you may not have considered.
This guide walks you through the complete pathway — from deciding which specialty fits your goals to maintaining your new credential once you've earned it.
Why Pursue a Post-Primary Credential?
Before diving into the how, it's worth being clear-eyed about the why. Post-primary certifications from the American Registry of Radiologic Technologists (ARRT) are not just résumé ornaments. They signal a verified, standardized level of competency in a specialty area — and employers know it.
The tangible benefits include higher hourly rates and shift differentials, access to travel tech contracts (which almost universally require specialty credentials), eligibility for supervisory and lead tech positions, opportunities to move into outpatient and ambulatory settings with more predictable schedules, and pathways into education, research, and applications roles with equipment vendors.
Beyond the practical, there's a clinical case to be made. CT, MRI, and mammography involve distinct physics, protocols, and patient care considerations that general radiography training doesn't cover in depth. Earning a post-primary credential means you've formally mastered that knowledge — and that matters for your patients.
Step 1: Choose Your Specialty
Not every specialty is the right fit for every technologist. Your choice should be shaped by your current clinical access, your long-term career goals, and — honestly — what kind of work energizes you. Here's a grounded look at the three most pursued post-primary credentials.
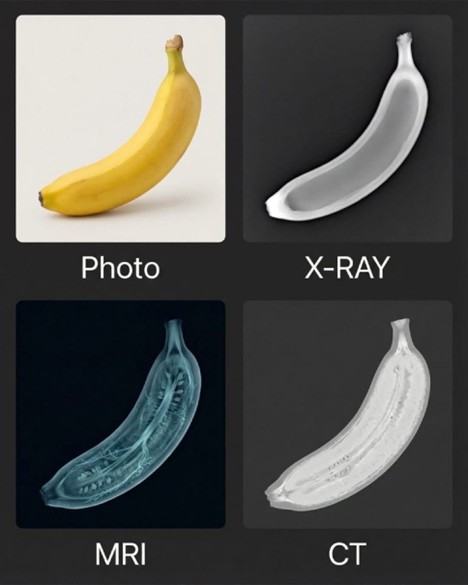
Computed Tomography (CT)
CT is often the fastest post-primary pathway for general radiographers because of how frequently it's embedded in the same facilities where RTs already work. Emergency departments, trauma centers, and inpatient imaging departments run CT around the clock, which means clinical exposure is often built into your existing position.
From a scope perspective, CT involves cross-sectional anatomy, complex protocols for vascular and soft tissue work, contrast administration and management, radiation dose optimization (including familiarity with CTDI and DLP values), and iterative reconstruction techniques. If you enjoy fast-paced, high-acuity environments and the technical challenge of protocol optimization, CT is a strong fit.
Demand is robust and consistent — CT volumes have grown steadily, and the modality sits at the center of trauma, oncology, and emergency workflows. Rural and underserved facilities are particularly hungry for credentialed CT techs, which also makes it a strong travel credential.
Magnetic Resonance Imaging (MRI)
MRI demands a different kind of technical mindset. The physics are more complex — you're working with radiofrequency pulses, magnetic field gradients, k-space, and tissue relaxation times rather than ionizing radiation. Understanding why an artifact appears on an image and how to suppress it is not something you can fake, which is part of why the MRI credential carries real weight.
Patient safety takes on a distinct character in MRI. You are responsible for a zone IV controlled environment, for screening implanted devices, and for making real-time safety decisions that a physics equation alone can't make for you. This is cognitively demanding work, and for many technologists it's deeply satisfying.
MRI also tends toward more outpatient settings — orthopedic imaging centers, freestanding radiology groups, neurology practices — which can offer more regular hours than inpatient modalities. Compensation is generally competitive, and the credential is in sustained demand as MRI utilization continues to expand across neurology, oncology, musculoskeletal, and cardiac applications.
Mammography
Mammography is its own category in several important ways. First, it is federally regulated under the Mammography Quality Standards Act (MQSA), which means every facility performing mammography must meet specific quality, personnel, and equipment standards inspected by the FDA. As a credentialed mammography technologist, you are part of a regulated quality system — not just a practitioner within it.
Second, mammography involves a patient population and care dynamic that many technologists find uniquely meaningful. Screening and diagnostic mammography require both technical precision and interpersonal skill: you are working with patients who may be anxious, in pain, or facing a potential diagnosis. The ability to position accurately while building patient trust is a genuine clinical skill.
Third, Digital Breast Tomosynthesis (DBT) — commonly called 3D mammography — is now standard of care at most facilities, adding another layer of technical competency the certification addresses. The credential is recognized by MQSA as meeting the continuing education requirements for interpreting physicians' technologists, which is a meaningful professional distinction.
If outpatient-focused work, a primarily female patient population, and the public health mission of early cancer detection resonate with you, mammography is worth serious consideration.
Step 2: Complete ARRT Structured Education Requirements
Once you've identified your specialty, the first formal requirement is completing Structured Education that aligns with the ARRT's defined content specifications for your chosen credential.
Structured Education is not simply any continuing education. The ARRT specifies content categories for each post-primary exam, and your education hours must map to those categories. For CT, MRI, and Mammography, the minimum is generally 16 hours, though Mammography requirements can extend to 24 hours depending on the educational pathway and how content areas are distributed.
This matters practically: if you complete 16 hours of CE in areas that don't align with ARRT's structured education domains for your specialty, those hours may satisfy your biennial CE requirement but will not satisfy the Structured Education requirement for the post-primary application. Review the ARRT's current content specifications document for your specialty before selecting a course.
Quality Structured Education for post-primary credentials covers the domains you'll be tested on — not just an overview. For CT, that means image reconstruction algorithms, helical pitch, dose optimization strategies, and anatomy applied to cross-sectional imaging. For MRI, it means pulse sequences, gradient systems, safety screening protocols, and artifact recognition. For Mammography, it means breast anatomy and pathology, positioning for all standard and supplemental views, MQSA regulatory requirements, and image quality and dose metrics.
Gage Continuing Education offers ARRT-recognized Structured Education in all three specialties, with content built to align precisely with exam domains and MQSA requirements where applicable.
Step 3: Complete Clinical Experience and Document Competencies
Structured Education satisfies the cognitive component of your post-primary application. Clinical competencies satisfy the performance component — the ARRT's verification that you have actually performed the required procedures under appropriate supervision.
Each specialty has a defined list of required competencies. These aren't checkbox items; they require demonstration of clinical proficiency under the oversight of a supervising technologist who holds the credential you're pursuing (or an interpreting physician in some mammography contexts).
For CT, competency categories include routine head and brain imaging, chest CT, abdomen and pelvis protocols, CT angiography, and procedures involving contrast — both IV administration and timing protocols for vascular studies. You'll also need to demonstrate competency in dose management documentation and protocol adjustment.
For MRI, required competencies span brain and intracranial imaging, spine protocols across cervical, thoracic, and lumbar regions, musculoskeletal applications, MR angiography, and safety screening procedures. The safety screening competencies carry particular weight given the physical risks associated with ferromagnetic materials in a high-field environment.
For Mammography, competencies include screening mammograms in both CC and MLO projections, diagnostic mammograms with additional views, DBT acquisition, and MQSA-specific documentation and quality control procedures. Because MQSA has specific requirements for technologist qualifications, the clinical documentation pathway is more tightly regulated in mammography than in other specialties.
One of the most common delays in the post-primary application process is incomplete or improperly documented competency records. Your supervising technologist must sign off on each competency, and the documentation must be retained and available for the ARRT application. Build a systematic tracking process from your first case, not retroactively.
If your current position doesn't offer sufficient exposure to all required competencies, consider a conversation with your department supervisor about rotating through the relevant modality, or explore a temporary position at a facility that can provide the exposure you need.
Step 4: Prepare for the Exam
With your Structured Education completed and your competencies documented, exam preparation becomes the priority. The ARRT post-primary exams are content-rich and require genuine conceptual understanding — not just factual recall.
CT exam preparation should prioritize image reconstruction and filtering, the relationship between pitch, mAs, and image noise, radiation dose metrics and dose reduction strategies, contrast pharmacology and injection protocols, and anatomy as it presents in cross-section across the major body regions. Vascular CT and CT angiography protocols are consistently represented on the exam and warrant focused review.
MRI exam preparation is physics-intensive in a way that surprises some candidates who underestimate the depth of knowledge required. MR signal generation, relaxation times (T1, T2, and T2*), pulse sequence parameters (TR, TE, flip angle), k-space filling strategies, coil configurations, and the physical mechanisms underlying common artifacts are all fair game. Beyond physics, MRI safety — RF heating, gradient-induced peripheral nerve stimulation, implant safety classifications, and the zones model of MRI suite access control — represents a substantial exam domain.
Mammography exam preparation involves a blend of clinical and regulatory knowledge that is somewhat unique among the post-primary exams. Breast anatomy and pathology, the principles of screen-film and digital imaging as applied to mammography, all standard and supplemental positioning views, MQSA regulatory standards including personnel qualifications and equipment performance standards, and the technical factors that govern image quality and radiation dose are all core content areas. The MQSA regulatory framework is tested more specifically than many candidates anticipate — review it as a primary document, not just as background reading.
Regardless of specialty, the most effective preparation combines content review with practice questions that mirror the exam's domain weighting. The ARRT publishes content specifications for each exam; use these as your study outline.
Step 5: Schedule and Take the ARRT Exam
ARRT post-primary exams are computer-based and offered year-round through Pearson VUE testing centers. Once the ARRT has reviewed and approved your application — including verification of your primary credential, Structured Education, and clinical competencies — you'll receive an Authorization to Test (ATT) with a window during which you must schedule and sit for the exam.
A few practical notes: the ARRT is specific about the application review timeline, which can take several weeks. Submit your application only when all required components are genuinely complete — incomplete applications create delays without benefit. Review the ARRT's current eligibility requirements directly, as requirements and fees are updated periodically.
On the exam itself, the computer-based format includes selected-response questions with time limits. Pacing matters. Candidates who have done thorough content review and practiced under timed conditions consistently outperform those who know the material but haven't calibrated their exam pace.
Step 6: Maintain Your New Credential
Earning the credential is the beginning, not the end. The ARRT requires 24 continuing education credits per biennium for each active credential, and those credits must be relevant to the content of your specialty.
For mammography, MQSA imposes additional CE requirements that run parallel to (and partially overlap with) ARRT biennial requirements. Specifically, MQSA requires 15 CE credits in mammography every 36 months, with specific content categories that must be covered. If you hold the mammography credential, tracking two separate CE cycles — ARRT and MQSA — is part of the ongoing professional obligation.
Beyond compliance, continuing education in your specialty is how you stay current in a field that continues to evolve. AI-assisted detection tools are entering mammography and CT workflows. MRI applications in cardiac and body imaging are expanding. Dose optimization standards in CT continue to develop. The technologist who engages with CE as genuine professional development — rather than as a compliance task — is the one who remains clinically relevant over a career.
Gage Continuing Education offers specialty-specific CE in CT, MRI, and Mammography designed to address both ARRT biennial requirements and MQSA continuing education categories where applicable.
Final Thoughts
The path from RT(R) to a post-primary credential is structured, achievable, and — for the right technologist — genuinely career-defining. The ARRT has designed the pathway so that a working radiographer can complete the requirements while continuing to practice. It requires planning, documentation discipline, and focused study, but it doesn't require a career pause.
If you're weighing the options, the best first step is straightforward: review the ARRT's current content specifications and eligibility requirements for the specialty you're considering. Then talk to technologists in that specialty at your facility. The combination of official documentation and on-the-ground perspective will give you a clear picture of what the commitment looks like in your specific practice environment.
The credential is within reach. The question is which one you're going after first.
Gage Continuing Education offers ARRT-recognized Structured Education and specialty continuing education for CT, MRI, and Mammography. Visit our course catalog to find programs that fit your timeline and meet your ARRT and MQSA requirements.